

It’s easy to split designs in software but the challenge for many embroiderers is in the stitching. I use a combination of templates, Perfect Alignment Laser and the advance stitch feature on my machine. First, split the design in Inspirations Perfect Embroidery Pro. Click here to review the steps. Send the two designs to your machine.
Print a template of both designs. I use Print & Stick Target Template Paper because its adhesive back will stick to the fabric. Align the two templates on the fabric focusing on placement of the entire design. For instance, if you’re embroidering a pillow, center the monogram (both designs aligned) on the pillow. Then remove the second design template (the second hooping). Hoop the fabric centering the crosshair of the first hooping. Stitch the design. 
Remove the fabric from the hoop. Place the second design template on the fabric aligning the template with the stitched design. 
Hoop adhesive stabilizer and remove the protective paper. Attach the hoop to the machine and stitch the first color of the second hooping, the alignment line. Remove the hoop and position the hoop under PAL aligning the horizontal beam with the horizontal marks on the hoop and the vertical beam with the stitched line. 
Place the embroidered fabric on the sticky stabilizer aligning the stitched line with the vertical beam and the horizontal beam with the template’s horizontal line. 
Double check the placement by lifting the fabric and checking that the stitched line on the fabric is aligned with the stitched line on the stabilizer. 
Attach the hoop to the machine and return to the beginning of color 1, the stitched line. Advance through color 1 watching the foot trace over the stitched line. It should align with the stitched line, if not, adjust the fabric until it does.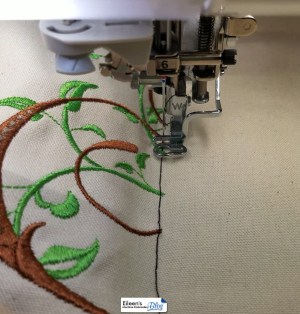
Stitch the second design. Now take a closer look. 
My sample is not perfect. 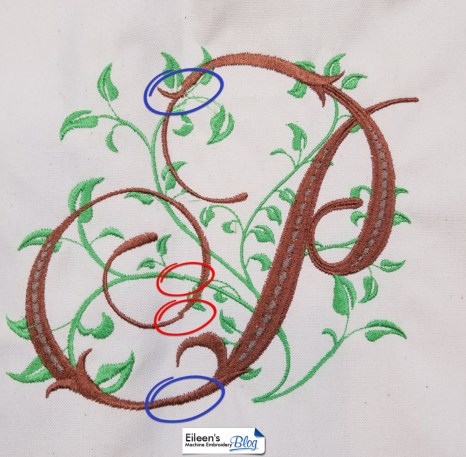
The four circles illustrate where the two designs connect. The connections are fine in the blue circles but the areas in the red circles need some help. I would fix these disconnected areas by sewing a narrow satin column (zigzag stitch) on the sewing machine to join the two areas. No one would ever know!
I hope you’ll forgive me for this not-so-perfect project and the poor photography on the laser shot. We’re moving our offices this week so my working environment is not quite up to what it should be. Hope to have everything back to normal in a week or two!
Last week’s winner of Quilt with an Embroidery Machine in 8 Easy Lessons is….BRENDA KENNEDY! Brenda said, “I have four tops that need to be quilted.Just purchased the Brother Dream Machine. I need to do something to justify the cost of the machine.I also have a Quattro 2.”
Brenda, we’ll email you to get your mailing address. Congratulations!
9 COMMENTS
Lori Walters
9 years agoThis looks like something I could do. I have a problem using my 7×12 monster hoop, It keeps siding apart while embroidering a quilt, I am keeping the bulk in control with the Short E frame. I have to hold the top and bottom frames together to keep them from sliding , sometimes even that doesn’t work. Any suggestions?
Karen
9 years agoLori I had the same thing. I have an 8 foot table so I set up the short e frame and used it without the legs, when I did that I did not have the sliding. Hope maybe that helps you. Karen
Donna Fecteau
9 years agoThis is beautiful. I have a quattro machine and no additional software, so I can’t do most of the things you talk about but I enjoy reading them anyway.
Marti Morgan
9 years agoLove learning more and more about Perfect Embroidery Pro.
Doree Shandera
9 years agoI LOVE that the project is not perfect. This is something that happens to quite a few of us, and you have shown how it looks and how to fix it. Thanks, that is the biggest help of all.
Linda King
9 years agoThanks, I may print this out, as I have the Pal & s
tickers. I still have to order the other things I need for this.
I also wanted to know how I can update my profile as my last name & email address has changed.
Thanks
Linda
eileenroche
9 years ago AUTHORWhen a magnetic hoop separates during quilting, it’s due to ‘quilt drag’. Quilt drag is what happens when the movement of the hoop pulls the whole (or large portion) of the quilt during the stitching. If you were using a standard hoop, the quilt would likely pop out of the hoop. It’s extremely important to allow the hoop to move only the sewing field area The shortE and the Weightless Quilter help keep the quilt above the bed. When using those products, keep an eye on the quilt as the hoop moves and make sure the quilt is not dragging. It should be lifted above the machine surface allowing the hoop to move freely.
Hope this helps!
Sara Redner
9 years agoI never have any luck aligning the 2 parts when I split designs. I’ll try to get up my courage and use your hints, but honestly, I still have my doubts!
Jenny Wood Shangraw
8 years agoMETALLIC THREAD IN LETTERING. Using 2cathle letters, I want to use metallic thread for both inside and outside. Should I decrease the density? Currenty it is 50mm. I don’t want gaps between the threads, which happened when before. Would 30mm be okay?