

Recently, I’ve been stitching a ton of free-standing embroidery designs on water soluble stabilizer (WSS). The results are stunning but I’m going through a ton of stabilizer! The designs are best stitched on two layers of WSS so of I cut two lengths to fill the hoop, I find I’m wasting about 12″ of stabilizer per hooping. Ugh! Don’t you hate wasting stabilizer?
Now, I keep the stabilizer on the roll and let it sit behind (or under) the machine. I roll out one length to cover the hoop, fold the stabilizer over to create the second layer, then hoop the two layers with the roll extending behind the top/back of the hoop.
On a traditional embroidery machine, i just place the roll over to the side of the machine leaving enough slack to avoid any drag.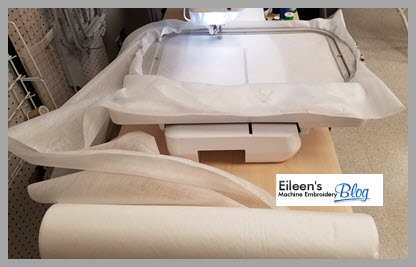
On a tubular machine, I pull the excess off to one side and place the roll under the hoop. Again, the key is to unroll enough stabilizer to avoid any drag on the hoop. 
After the embroidery is complete, just remove the project from the hoop, slice the stabilizer close to the embroidery and repeat the process.
You have to try this!
18 COMMENTS
Belinda
8 years agoI’ve benn doing that for a few years. When doing a lot of the same items it saves a lot. But you have to be sure that the roll does not get caught on the machine or elsewhere and hinders the stitchout.
Carolyn H
8 years agoI just finished doing a free standing lace angel that is made up of several parts. Wish I had seen this sooner so I didn’t waste so much stabilizer.
Marti Morgan
8 years agoI have been meaning to do this with my stabilizer, but for some reason forget until I read someone is doing it. Hope I can remember until tomorrow, ha ha
Kathleen De Verville
8 years agoI fail to see how you are saving wss, you are still doubling the stabilizer.
Belinda
8 years agoThe savings is in the length, by keeping it on the roll you will save 3 to 5 inches of stabilizer because once you unhoop, you cut the stabilizer close to the embroidery, saving the amount from where the embroidery ends to where you would have cut it if you did not leave it on the roll.
Kathleen De Verville
8 years agoYou are right, I thought about that after I already posted, about an hour later. Stuff don’t always come to me right away, I attribute it to my oldtimers disease-CRS.
No
8 years agoI have not done the FSL but in the past for other projects. I have sown a patch that extended about an inch over the area that had been cut out of the stabilizer to help cut cost which worked out for me. It may work differently when it is the wash away stabilizer.
Laraine
8 years agoI do a lot of FSL Angels. I have been using this method for 2 years but I do not leave it on the roll. I cut about a yard of WSU’s, fold it in half, then hoop at my far right end of the cut strip. I roll up the excess on the left end into a tube and secure it with clips. As I finish a set of angels I rehoop to my left placing the last embroidery as close to the hoop as possible, rolling the now excess on the right into a tube and securing with a clip. I continue this way until I get to the far left edge. I I get an extra hooping out of every yard.
Mary Esser
8 years agoI enjoy doing FSL How many layers of stablizer should be used? I use two, but lately I heard only one was need. How many should I use?
Janice
8 years agoI have enjoyed FSL for years and always hated when I felt the stablizer was wasted. I have never thrown away any scraps (just like material) so I might can use it. I love this way to do the stabilizer because it will save so much. I always try to make sure I fit the design so I will have usable pieces when i am finished. The other thing I have tried and it will work on large designs is to hoop scraps together to create a usable space that can be used. I have also “read” that the scraps can be dissolved and the embroidery can be dipped to make it firmer. I always look to find “other ways” to do things.
Laraine Lewis
8 years agoyes you are doubling the stableizer which is recommended for FSL but by using the long piece of stabilizer you can put the hoopings closer together. You can put the edge of the angel from hooping one right up against the plastic of the hoop for the second angel. you save about 3 inches per hooping. There is no difference or savings in the amount of stabilizer from the top of the hoop only on the sides, I usualy get an extra hooping out of 30 inches of stabilizer when I am using my 5×7 hoop.
Judy
8 years agoI trim around my design and cut my leftover stabilizer into strips and sew it together to make more.
eileenroche
8 years ago AUTHORYou definitely don’t want to patch WSS when doing free-standing designs. They are stitch intensive and need the strong foundation of a hooped stabilizer.
eileenroche
8 years ago AUTHORI use two layers. You can get away with one layer for light, low-stitch count designs but it’s best to use two for heavier designs.
eileenroche
8 years ago AUTHORThat’s a good idea as long as your sewing stitches do not get caught in the embroidery design.
eileenroche
8 years ago AUTHORThe scraps can be used to make a liquid stabilizer. Dissolve the WSS in a small amount of water then submerge your fabric into the water. Remove and air dry. Test this with varied amounts of stabilizer and water to see what works best for your needs.
Sara Redner
8 years agoI also do this, not just with WSS, but even with cut-away or tear-away. I also sew strips together – but only of cut-away, not WSS. Like you said, WSS needs the stability and you don’t want your “seams” to get caught up in the FSL design.
Debbie Gamble
7 years agoThank you for the explanation. I am starting to do Valentine FSL Bags and was wondering the same thing. I’m using a Baby Lock Journey and Baby Lock Alliance so I’m able to try out both machines for this method.