

Stitching free-standing lace can be fun and frustrating. Fun? Definitely because the results can be outstanding. Frustrating because the results are not always what you had hoped! The challenge lies in getting the outlines to align with the edges of the lace. Most likely, the lace will include a satin border that gives a clean finish to the lace. But after all those stitches are laid down, there is often a gap between the border and the lace. So frustrating!
Like I often do, I read the instructions which were’ hoop with water soluble stabilizer.’ I know from past experience that mesh-type water soluble would be a smarter choice than film-type. I also know that a standard hoop would probably grip the mesh-type water soluble firmly.
This image clearly shows where the lace has pulled in during the embroidery process. The satin border marches down the perimeter of the design but doesn’t meet the lace.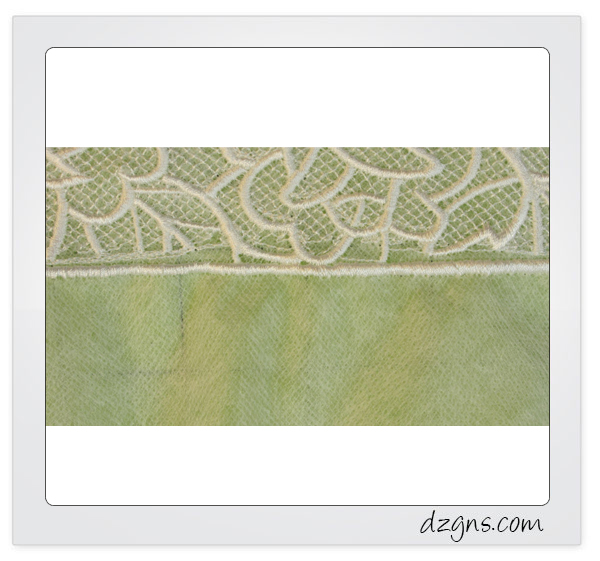
The problem is not in the digitizing because the digitizer took the proper steps in creating a base for both the lace and the satin edge. I watched the design stitch – it walked around the perimeter, moved on to the open fill, the decorated lace and finally the satin edge. But still the lace/stabilizer pulled in at the horizontal and vertical centers of the design. That’s a bummer, right? It took 70 minutes to stitch this panel and it was a lot of thread!
Was it worth it? Yes, it ignited my ‘discovery mode’. I was off to find a solution. My next attempt included adding a layer of tulle and another layer of mesh-type water soluble stabilizer in a standard hoop. I was certain that would fix it. Nope, didn’t make much difference, same problem.
I figured it was in the hooping. So I ‘McGyvered’ a solution. I hooped a rubberized mat in Snap Hoop Monster and placed it on a cutting mat. Then I cut open the sewing field with a rotary cutter. Since the cutter couldn’t get all the way to the edge of the hoop, I removed the hoop and trimmed the mat with scissors. Then I placed one layer of mesh-type water soluble stabilizer over the magnetic frame, then the rubberized mat and finally the metal frame.
Perfect! It stitched beautifully with no tulle and one layer of stabilizer.
I’m keeping the rubberized mat with the opening handy, I know I’ll be using it again in the future.
I was using a multi-needle machine but the same technique would work on a traditional machine. Place the water soluble stabilizer over the metal frame, the rubberized mat and then the magnetic top.
Top 3 Tips for Free-standing Lace
Slow the machine down.
Use mesh-type water soluble stabilizer.
Insert a layer of rubberized matting.
What’s your favorite ‘MacGyver’ trick?
30 COMMENTS
Lee
10 years agoWhat are you using for the rubberized matting. I use two layers of mesh water soluble stabilizer hopped crosswise to each other and haven’t had much problem with this happening. Your way sounds safer.
Pam Bjorlo
10 years agoI take “Vet Wrap” from the barn, and wrap the hoops of my Quattro to avoid this happening. That works for me. I LOVE this idea of yours. I will try this on my multineedle, although I don’t have problems with my MH. I use non woven WSS as stabilizer. Thanks for the experiment and the time it took to do this!! Happy Stitching, Pam
eileenroche
10 years ago AUTHORLee – I used shelf liner, bought in the dollar store. I didn’t try hooping the stabilizer crosswise but that’s a good suggestion. However, the rubberized mat eliminated the need for two layers of stabilizer – it did the trick with one layer.
eileenroche
10 years ago AUTHORMy original testing was done on a standard multi-needle hoop, that’s where I encountered trouble.
Karin C
10 years agoI’ve used that shelf lining for years, and it really helps, even on cotton or other lightweight fabrics. Mine finally wore out & I removed it and had to do some lace before I got any put back on, and yup, you guessed it…the dreaded space around the edge. I have to admit, I was under a deadline, so I just put the machine on a wide satin stitch and made me another row, slightly overlapping the satin stitch of the lace. It worked, likely because it was such a minimal gap.
esther bartels
10 years agoHow do you get rid of the rubber after the stitching? I’m not understanding how the lace is released from the rubber?? Please explain.
Bonnie smith
10 years agoI don’t haveva multi needle machine. Most oif my lace designs have a lot of color changes. How woulkd this work with a magnetic hoop?
Beal
10 years agoShe cut a window in the rubber so it would the machine could stitch without going through the rubber. There’s nothing to release (except WSS).
Beal
10 years agoShe used a magnetic hoop so there’s nothing to change.
Kim A
10 years agoI am new to embroidery so I have not been able to come up with any Macgyver solutions. Sure wish I had a few though to address the many issues I have had starting out with embroidering. Reading your newsletter has helped me alot though. I certainly will keep this tip handy.
Karen S
10 years agoSome of my hoops came with a product called hoop ease works just like the shelf liner great idea for my hoops that don’t have it. Thanks for sharing.
Pam Bjorlo
10 years agoBe patient with yourself Kim. Embroidery has a learning curve. Especially when ripping out stitches can sometimes ruin the garment. We have all had to endure the learning, and I don’t think it ever stops. I have found that Peggy’s stitch eraser, I think that is what it is called, can help a lot. I once embroidered words on a sweatshirt and misspelled a word. Yikes!! I was able to rip out the two reversed letters and finish the shirt. Now I can laugh!!
Bonnie Gray
10 years agoGood solution. Will have to remember that the next time I do FSL. Thanks.
Nancy Stansbury
10 years agoAbsolutely love your solution! Getting some extra mat I have in the closet and making one.
Brenda Rhinehart
10 years agoYour lace is beautiful !!! Would you share with us — what are you going to do with this lace rectangle ???
Karen
10 years agoCall me crazy, but what did the rubberized mat do to help the separating? Did it just hold the WSS in place from shifting?
Dori
10 years agoHi Karen, sometimes our frames do not hold consistently with the same amount of pressure all around the frame, especially with WSS. This rubber mat/draw liner tip is a great way to make sure that all water soluble stabilizer is gripped evenly.
Kim A
10 years agoThanks Pam for your encouraging words. I am going to keep at it. I did see that tool you are talking about. I wondered if it was a worthwhile investment. I am going to order one, thanks.
Cheryl Belden
10 years agoI too am new to machine embroidery and this is so helpful to me!
Sara Redner
10 years agoI put quilter’s “no-slip” hoop tape on the outside of the inner hoop. It does help, but I have also done as Karin C said and stitched a wide row of satin stitch around the perimeter to cover the gap.
Judy Brown
10 years agoI’m also new to FSL but I used the multi-purpose rubber coating called ‘Plasti Dip’ by Performix. You can buy it at almost any hardware store but mine was left over from another project. I only painted the outer edge of the inner hoop but you could also paint the inner edge of the outer hoop. This has worked great for me and I don’t need to watch for overlapped or folded rubber matting. I’ve not had the courage to try only 1 layer or WSS but will definitely try it now.
water ionizer
10 years agoWill probably be back to get more. Thank you
Beedragonlady
10 years agoJudy Brown stole my idea! My grandfather showed me the dip many years ago and I usually use it on tool handles to give added grip. I also put it on the bottom of my serger foot control to keep it from sliding on the floor. Lots of uses!
Zoe
10 years agoEileen, thank you for this tip.. Do not have a MacGyver moment but sure glad you did…also enjoyed the different processes you tried..
Thank you to all the others who shared tips.
Angela
10 years agoI’m a little confused how you came up with the mat idea in the first place? Is it because the stabilizer was moving and that’s what was causing the misalignment? If so, was it because you used a magnetic hoop type? Would this be a problem in a regular tension type hoop?
Becky Thompson
10 years agoI have a magnetic hoop for my 5×7 single needle machine that I got from dzns. Maybe I’m hooping wrong but to me, the magnet isn’t strong enough and my fabrics shift during the stitching process. I’ve overcome that with those black metal clips used to hold office documents together on the top and bottom of the frame to hold it together. Using the shelf liner seems to me that the magnets wouldn’t hold at all because there’s too much bulk between the magnets. I’m going to check YouTube for a video on how to use it. Right now it just hangs on my wall unused because I’ve never gotten it to work well.
Sharon R
10 years agoThank you! I have some FSL designs I was planning on trying within the next few days. So glad I saved your newsletter on my phone while I was traveling out of state, otherwise I might have missed this great tip.
cristina
10 years agoThis was so nice visually!
Bruce
9 years agoI just love your solution. Thank you for sharing.
Bruce, https://www.printavo.com
Aimee Aimee
9 years agoThank you for a great explanation. I was looking online for a similar idea and really appreciate it
a href=” http://digitembcom.over-blog.com/digitizing-logo-embroidery.html “> Digitizing Logo Embroidery