

Here’s a sneak peek at a recent work in progress. These jeans will be featured in the Volume 110 May/June 2018 issue. I’m excited to see them on the model. (Update: The jeans look beautiful on the model. Scroll to the bottom of the blog to see!)
I know you’ve seen the flower patches in previous posts but check out the magnifying effect on this patch:
Isn’t that fun? Follow along in Inspirations’ Perfect Embroidery Pro to duplicate the technique. Use the Art tool to draw a rectangle. Select the rectangle, right click, Convert to Complex Fill. 
In Properties Box, change the Fill type to Motif, Pattern 129. Change the Pattern Length to 10.0. Click Apply. 
Draw a circle and position it off one corner. 
Convert the circle to Complex fill. Select the circle and rectangle and click on Combine. 
The overlapped area will be empty.

Draw around the open space. 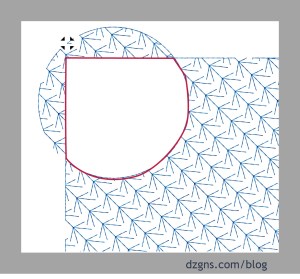
Convert to Complex Fill, Motif, Pattern 129, Pattern length 18.0 mm.
Select all, right click, Utility, Create Outline. 
Enter 0.0 in the distance field and click OK. Make sure the color sequence is rectangle, circle and border. Since I planned on stitching this on denim, I assigned Vintage Retro 40 wt thread to the first two colors and the Vintage Rope 15 wt. to the border to mimic hand stitches. Enjoy!

2 COMMENTS
maga
9 years agoWhat a fun idea – love how the patch becomes an irregular shape. Very inspiring, thank you!
Aimee Aimee
9 years agoMachinesembroidery
Thank you for a great explanation. I was looking online for a similar idea and really appreciate it